
What the plugin does
The plugin runs on your cPanel & WHM server and does five things for you:
- Keeps SpamDuster's domain list in sync. Every domain on the server is sent to SpamDuster with the cPanel account that owns it, every few minutes and whenever a domain is added or removed. Each hosting customer then sees only their own mail.
- Keeps mail routing right. A filtered domain stays on Local mail routing after its MX record points at SpamDuster, so filtered mail is delivered to its mailboxes on this server. A domain whose mail is hosted elsewhere is never changed.
- Trusts SpamDuster on the server. It adds SpamDuster's addresses to the mail server's checks and to the firewall and brute-force protection the server uses, for mail only. It removes them again when they are no longer needed.
- Moves each domain's MX record to SpamDuster, step by step (optional). It first proves SpamDuster accepts mail for the domain, then lowers the record's lifetime, waits, makes the change, checks the name servers, and puts the old record back by itself if SpamDuster stops accepting the domain.
- Adds a Mail Filtering page to cPanel where each hosting customer reviews and releases their held mail. See Manage filtered mail in cPanel.
Removing the plugin puts back everything it changed.
Before you start
You need:
- root access to the cPanel & WHM server;
- an administrator login to the SpamDuster console;
- the server's public IP addresses (IPv4 and IPv6), the ones it uses to connect out.
Add the server in SpamDuster
In the SpamDuster console, add the cPanel server as a control panel and copy its two tokens, the tenant token and the sync token. They are shown only once. See Connect a hosting control panel.
Install the plugin
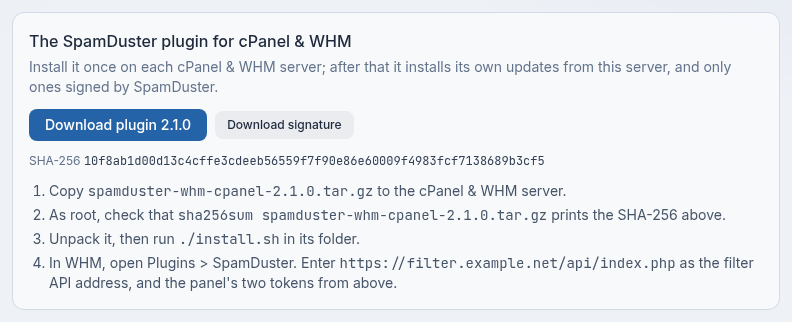
Download the plugin from your SpamDuster console. It is not on any public website.
- In the console, open Control Panel Integration.
- Under The SpamDuster plugin for cPanel & WHM, select Download plugin. The page shows the file's SHA-256.
- Copy the file, for example
spamduster-whm-cpanel-2.1.0.tar.gz, to the cPanel server. - On the cPanel server, as root, run
sha256sumon the file and check that it prints the SHA-256 shown on the page. - Unpack the file, then run
./install.shin its folder.
If the page says the server does not carry the plugin yet, your SpamDuster has not installed the update that brings it. It arrives with a SpamDuster update.
The installer adds SpamDuster under WHM > Plugins and Mail Filtering under Email in cPanel. Nothing changes on the server until you save the settings in WHM.
Connect the plugin to SpamDuster
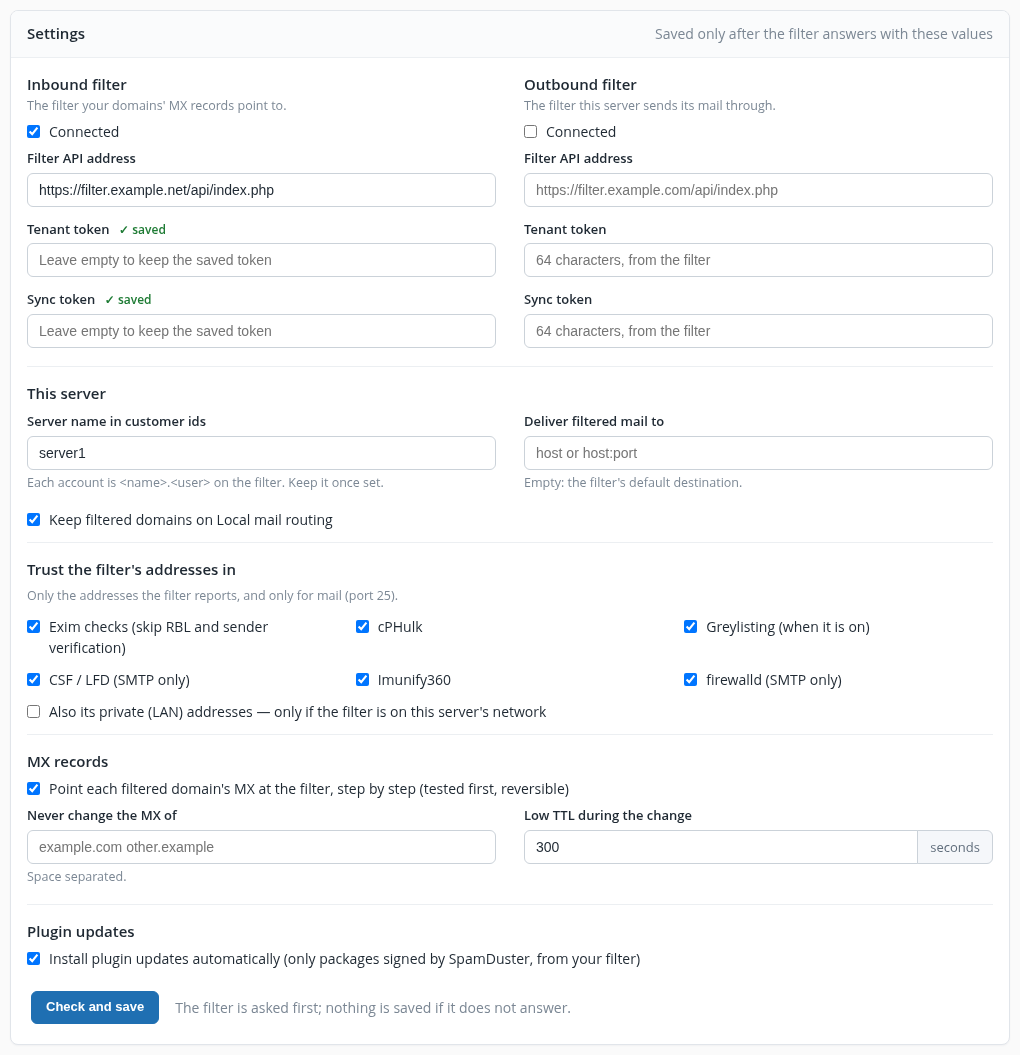
- In WHM, open Plugins > SpamDuster.
- Under Inbound filter, select Connected.
- In Filter API address, enter your SpamDuster console's address followed by
api/index.php, for examplehttps://filter.example.net/api/index.php. The plugin section of Control Panel Integration shows the exact address to enter. - Paste the Tenant token and the Sync token from the console.
- In Server name in customer ids, enter a short name for this server, for example
server1. Each cPanel account appears in SpamDuster as this name followed by the account's user name. Do not change it later. - Leave Deliver filtered mail to empty to deliver to the destination set in the SpamDuster console.
- Choose the options under Trust the filter's addresses in and MX records (see the sections below). Leave Install plugin updates automatically selected (see Keep the plugin up to date).
- Select Check and save.
The plugin asks SpamDuster first and saves nothing unless SpamDuster accepts the address and both tokens.
Leave Outbound filter unticked. It is for SpamDuster On-Premise Outbound, which is not available yet.
Check that it works
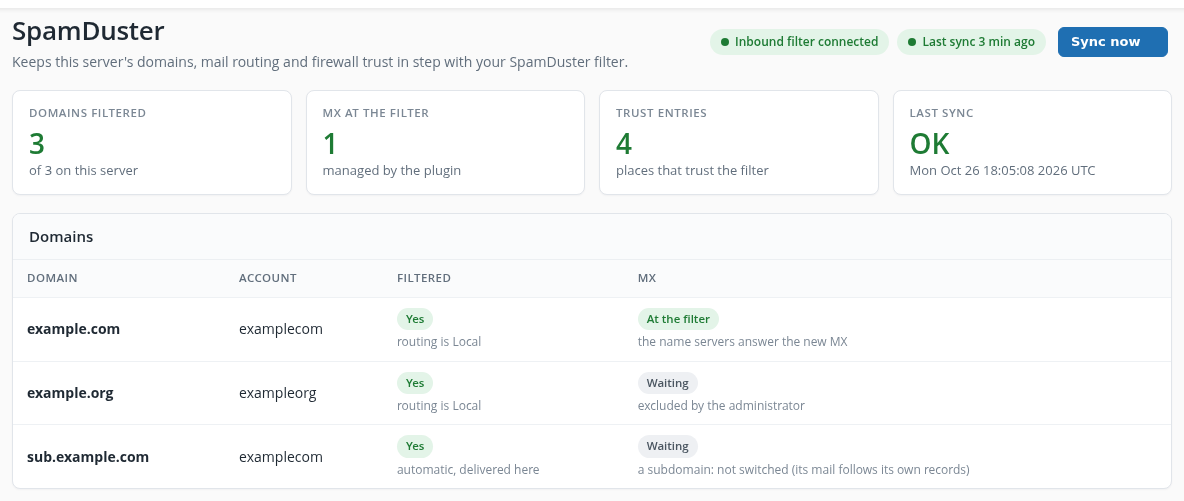
The top of Plugins > SpamDuster shows whether the plugin is connected and when it last synced. Select Sync now to run it at once instead of waiting for the next run.
- Domains filtered: how many of the server's domains SpamDuster is filtering.
- MX at the filter: how many domains' MX records the plugin has moved to SpamDuster.
- Trust entries: how many places on the server trust SpamDuster.
- Last sync: whether the last run succeeded. If it failed, the errors are listed on the page.
The Domains table lists every domain with its cPanel account, whether SpamDuster filters it and its mail routing, and where its MX record stands.
Which places on the server trust SpamDuster
Under Trust the filter's addresses in, choose where the plugin adds SpamDuster's addresses:
- Exim checks: SpamDuster's deliveries skip the mail server's blocklist and sender checks, which SpamDuster has already done.
- cPHulk and CSF / LFD: SpamDuster is never blocked as a brute-force or abuse source. It delivers all your domains' mail from the same addresses, so a block would stop mail for every domain.
- Greylisting: SpamDuster's deliveries are not delayed a second time.
- Imunify360 and firewalld: SpamDuster may connect for mail.
The CSF and firewalld entries open only the mail port (25), never every port. The plugin uses only the addresses SpamDuster reports, removes only entries it added, and never removes an entry that was there before. A protection the server does not run is shown as Not in use.
Select Also its private (LAN) addresses only if SpamDuster runs on this server's own private network.

Let the plugin move MX records
Select Point each filtered domain's MX at the filter to have the plugin move each domain's MX record to SpamDuster for you. It does this only for domains whose DNS zone is served by this server, and one step at a time:
- It checks that SpamDuster accepts mail for the domain.
- It lowers the MX record's lifetime to the Low TTL during the change, and waits for the old one to expire.
- It switches the MX record in one checked change, after saving a copy of the old one.
- It checks that the name servers answer with the new record.
If SpamDuster later stops accepting mail for the domain, or the domain's mail routing is changed to Remote, the plugin puts the saved MX record back. Subdomains are not switched; their mail follows their own records.
List any domain the plugin must never change under Never change the MX of, separated by spaces. To move MX records by hand instead, see Change your MX records.
Keep the plugin up to date
You install the plugin by hand only once. After that it installs its own updates:
- Once a day it asks your SpamDuster whether a newer plugin is available.
- It installs an update only when the package is signed by SpamDuster. Updates come only from your own SpamDuster, never from a public website.
- It never installs an older version than one it has already had.
- If an update does not install, or the plugin does not work after it, the plugin puts the previous version back by itself, and the WHM page says what happened.
The Plugin section of Plugins > SpamDuster shows the installed version, when it last checked and what it found. Select Update now to check at once instead of waiting for the daily check.

To install updates yourself instead, clear Install plugin updates automatically under Plugin updates in the settings and select Check and save. Update now still works.
A new plugin version reaches your SpamDuster with a SpamDuster update, so a server can show the newer version a little after it is released.
A plugin installed before version 2.1
A plugin older than version 2.1 cannot update itself. Install the current one once from the console download, as in Install the plugin. From then on it updates itself.
- Version 2.0: your settings are kept.
- The older one-token plugin (its panel is marked Older mode in the console): the installer removes it and keeps its old settings in a root-only folder. Its token was stored where hosting accounts could read it, so treat it as exposed. In the console, select Upgrade for the panel to get two new tokens, then connect the plugin in WHM as in Connect the plugin to SpamDuster. See Connect a hosting control panel.
Outgoing mail by account
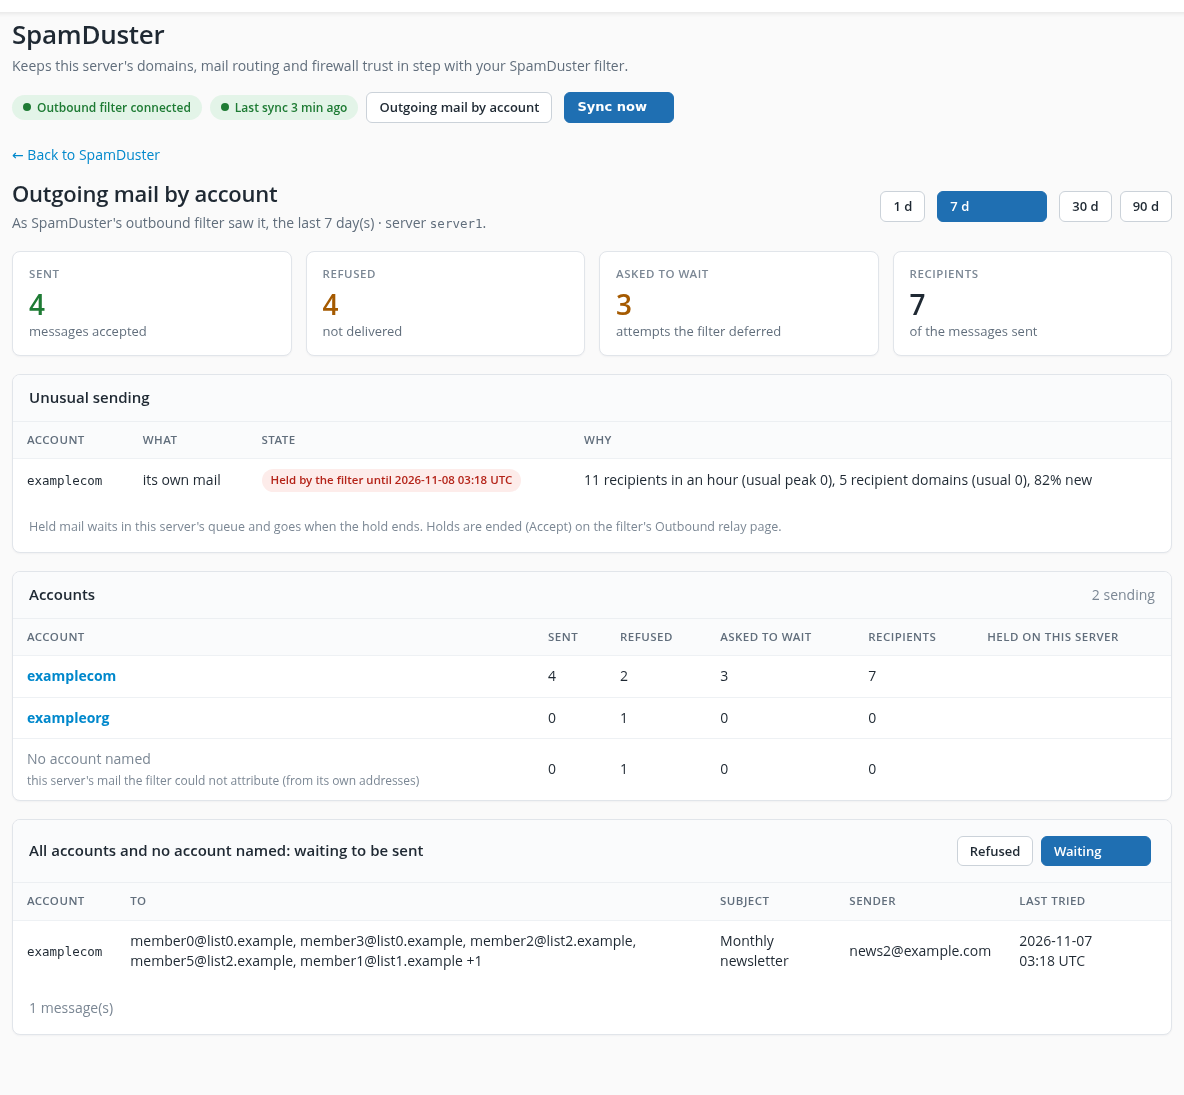
When the server is also connected to SpamDuster's outbound filter (see SpamDuster On-Premise Outbound), the SpamDuster page in WHM has an Outgoing mail by account button next to Sync now. It shows the outgoing mail of the whole server, as the outbound filter saw it:
- Sent, Refused, Asked to wait and Recipients for the last 1, 7, 30 or 90 days. Select the period at the top right.
- Accounts: one row per cPanel account that sent mail, with its own counts. A last row, No account named, counts the server's mail the filter could not attribute to an account, for example mail from the server's own addresses.
- Unusual sending: an account whose outgoing mail the filter is holding because it sent far more than usual, with the reason and when the hold ends. Held mail waits in the server's queue and goes when the hold ends; nothing is lost.
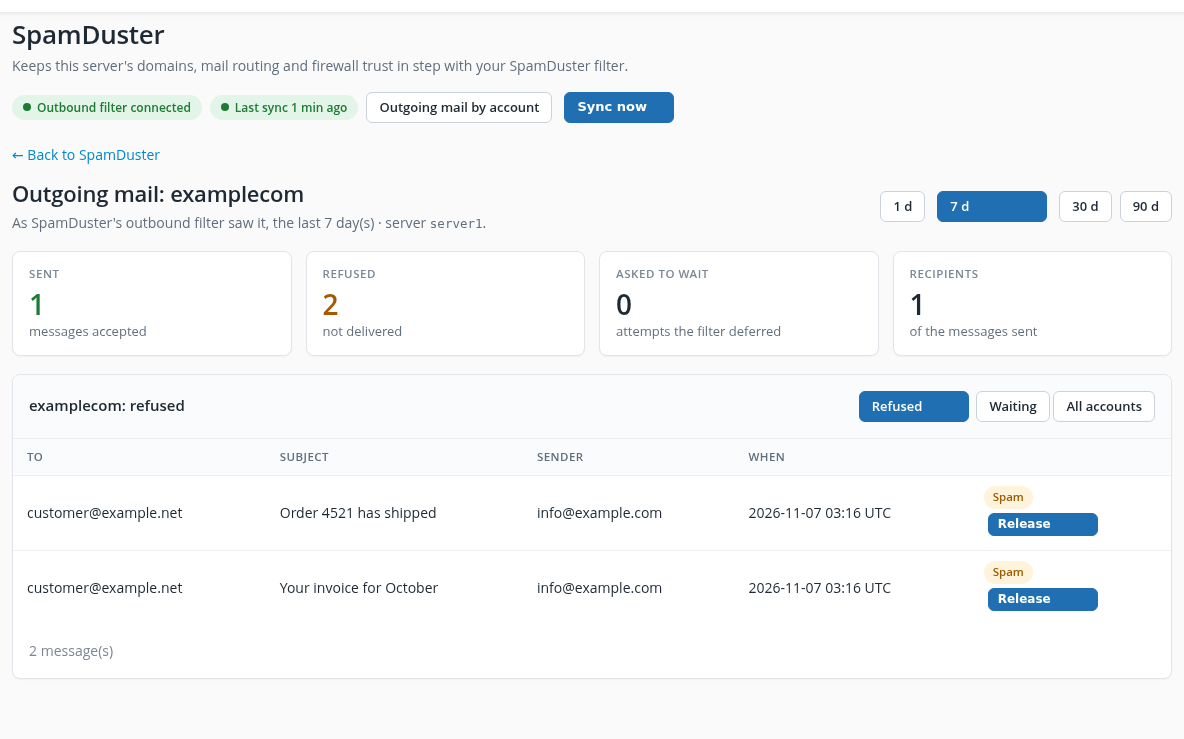
- Two lists, Refused and Waiting: the messages the filter did not deliver and the ones it asked the server to send again later, with recipients, subject, sender and time. A message held as spam has a Release button; it asks before it sends the message as it was written. Phishing and virus messages cannot be released.
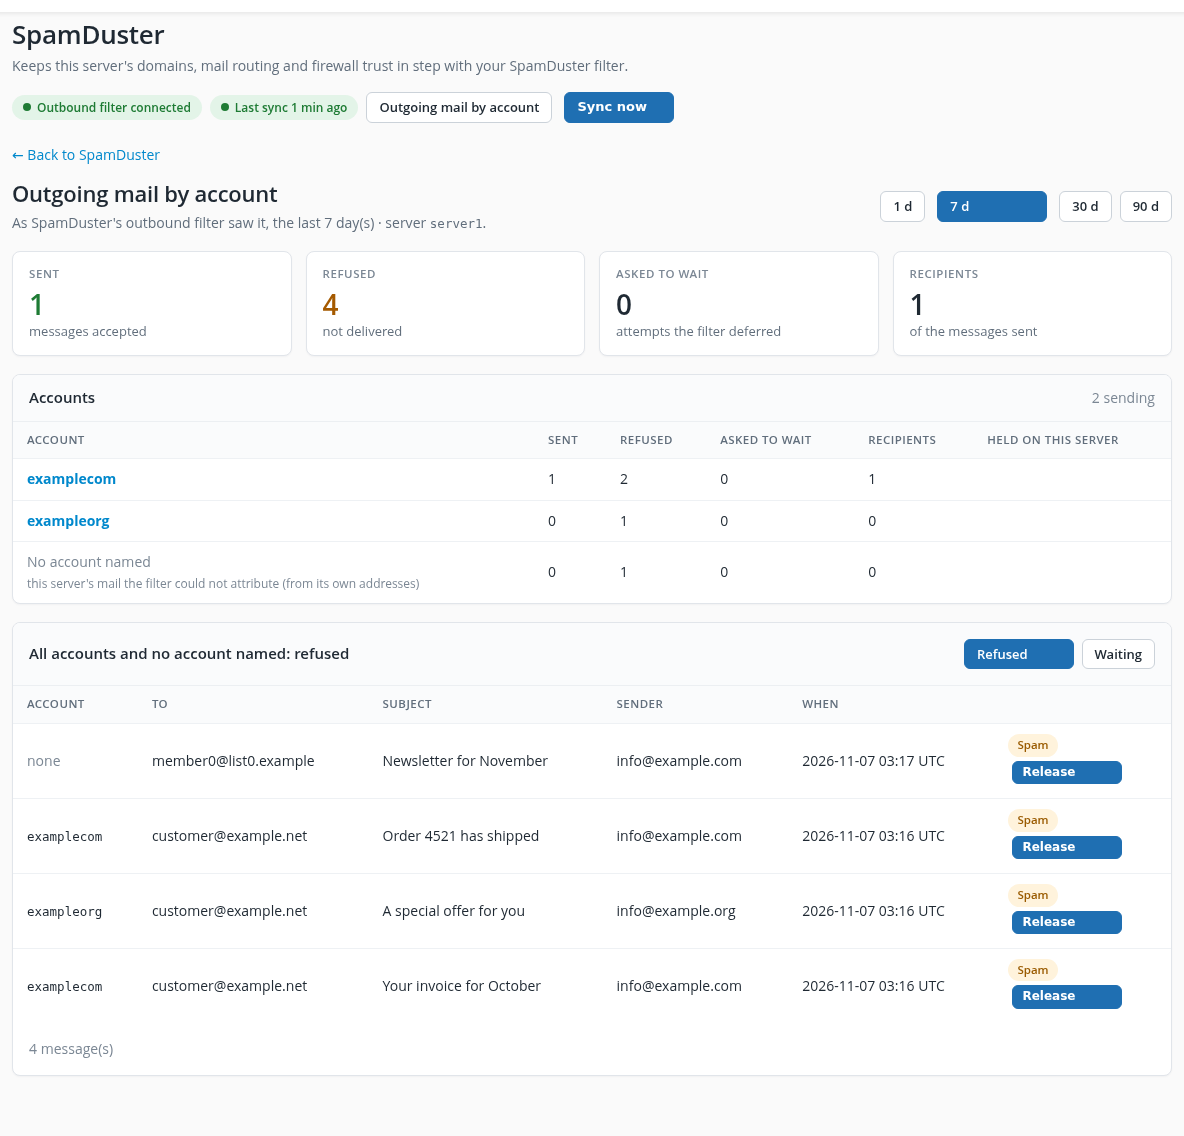
Select an account's name to see only its mail, with the same two lists. All accounts goes back to the whole server.
When the filter is holding an account, the Unusual sending table appears, and Waiting lists the held messages.
Each hosting customer sees their own outgoing mail in cPanel. See Manage filtered mail in cPanel.
If a sync would remove many domains
If a run would stop filtering many domains at once, the plugin holds that change and keeps filtering them. The WHM page lists the domains. If they really left the server, select Confirm and push; otherwise fix what removed them from the server.
Remove the plugin
- In Plugins > SpamDuster, under Remove the plugin's changes, type
RESTOREand select Restore everything. This puts every MX record, mail routing setting and trust entry the plugin changed back as it was, then pauses the plugin. - On the server, as root, run
./uninstall.shin the plugin's folder.
Restore before you uninstall: a domain whose MX record points at SpamDuster keeps receiving mail only while this server trusts SpamDuster. If the restore reports errors, the uninstaller removes nothing until they are fixed.
Then delete or disable the panel in the SpamDuster console. See Connect a hosting control panel.
